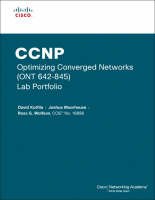
CCNP Optimizing Converged Networks (ONT 642-845) Lab Portfolio (Cisco Networking Academy)
Cisco Press (Verlag)
978-1-58713-216-2 (ISBN)
- Titel ist leider vergriffen;
keine Neuauflage - Artikel merken
Lab Portfolio
David Kotfila • Joshua Moorhouse • Ross G. Wolfson, CCIE® No. 16696
CCNP Optimizing Converged Networks (ONT 642-845) Lab Portfolio provides you with opportunities for hands-on practice with optimizing and providing effective QoS techniques in converged networks operating voice, wireless, and security applications. Topics also include implementing a VoIP network, specific mechanisms for implementing the DiffServ QoS model, AutoQoS, wireless security, and basic wireless management.
Those preparing for the Optimizing Converged Cisco Networks (ONT 642-845) certification exam should work through this book cover-to-cover. Or, if you need to quickly review configuration examples, you can go directly to the relevant chapter.
CCNP Optimizing Converged Networks (ONT 642-845) Lab Portfolio includes
21 Labs built to support v5 of the Optimizing Converged Networks course within the Cisco® Networking Academy® curriculum, providing ample opportunity to practice.
2 Challenge and Troubleshooting Labs have been added to the core curriculum labs to test your mastery of the topics.
1 Case Study to give you a taste of what is involved in a fully functioning network, covering all the technologies taught in this course. Even if you do not have the actual equipment to configure these more complex topologies, it is worth reading through these labs to expand your thinking into more complex networking solutions.
David Kotfila, CCNP®, CCAI, is the director of the Cisco Networking Academy at Rensselaer Polytechnic Institute (RPI), Troy, New York.
Joshua Moorhouse, CCNP, recently graduated from Rensselaer Polytechnic Institute with a bachelor of science degree in computer science, where he also worked as a teaching assistant in the Cisco Networking Academy. He currently works as a network engineer at Factset Research Systems.
Ross Wolfson, CCIE® No. 16696, recently graduated from Rensselaer Polytechnic Institute with a bachelor of science degree in computer science. He currently works as a network engineer at Factset Research Systems.
Use this Lab Portfolio with:
CCNP ONT Official Exam Certification Guide
ISBN-10: 1-58720-176-3
ISBN-13: 978-1-58720-176-9
CCNP ONT Portable Command Guide
ISBN-10: 1-58720-185-2
ISBN-13: 978-158720-185-1
This book is part of the Cisco Networking Academy Series from Cisco Press®. Books in this series support and complement the Cisco Networking Academy curriculum.
David Kotfila , CCNP, CCAI, is the director of the Cisco Academy at Rensselaer Polytechnic Institute (RPI), Troy, New York. Under his direction, 350 students have received their CCNA, 150 students have received their CCNP, and 8 students have obtained their CCIE. David is a consultant for Cisco, working as a member of the CCNP assessment group. His team at RPI has authored the four new CCNP lab books for the Academy program. David has served on the National Advisory Council for the Academy program for four years. Previously he was the senior training manager at PSINet, a Tier 1 global ISP. When David is not staring at his beautiful wife Kate, or talking with his two wonderful children, Chris and Charis, he likes to kayak, hike in the mountains, and lift weights. Joshua Moorhouse, CCNP, recently graduated from Rensselaer Polytechnic Institute with a B.S. in computer science; he also worked at RPI as a teaching assistant in the Cisco Networking Academy. He currently works as a network engineer at Factset Research Systems in Norwalk, Connecticut. Josh enjoys spending time with his wife Laura, his family, and friends. Ross G. Wolfson, CCIE No. 16696, recently graduated from Rensselaer Polytechnic Institute with a B.S. in computer science. He currently works as a network engineer at Factset Research Systems. Ross enjoys spending time with his friends, running, and biking.
Introduction xiv
Chapter 1 Describing Campus Network Requirements 1
Lab 1-1: Optimizing Converged Networks Lab Configuration Guide 1
Chapters 3, 4, 5: Quality of Service Scenarios 2
Chapter 6: Wireless Scenarios 5
Chapter 2 Cisco VoIP Implementations 7
Lab 2-1: Configure CME Using the CLI and Cisco IP Communicator (2.6.1) 7
Scenario 7
Step 1: Configure Addressing 7
Step 2: Configure Router Telephony Service 9
Step 3: Create Directory Numbers 10
Step 4: Create Phones 11
Step 5: Install Cisco IP Communicator 12
Step 6: Run Cisco IP Communicator 16
Step 7: Establish a Call from Host A to Host B 19
Step 8: Change the Codec Being Used 21
Chapter 3 Introduction to IP QoS 25
Lab 3-1: Preparing for QoS (3.6.1) 25
Overview 26
Step 1: Preliminaries 27
Step 2: Create Basic Pagent IOS and TGN Configurations 27
Step 3: Store Basic Pagent Configurations 33
Step 4: Create Advanced Pagent IOS, TGN, and NQR Configurations 34
Step 5: Store Advanced Pagent Configurations 38
Step 6: Display Traffic Statistics 38
Basic Pagent Configurations 40
IOS Configuration on R4: Stored in flash:basic-ios.cfg 40
TGN Configuration on R4: Stored in flash:basic-tgn.cfg 41
IOS Configuration on ALS1: Stored in flash:basic.cfg 41
Pagent Configurations 42
IOS Configuration on R4 (TrafGen): Stored in flash:advanced-ios.cfg 42
TGN Configuration on R4 (TrafGen): Stored in flash:advanced-tgn.cfg 43
IOS Configuration on ALS1: Stored in flash:advanced.cfg 43
NETLAB-Compatible Advanced Pagent Configurations 44
IOS Configuration on R4: Stored in flash:advanced-ios.cfg 44
TGN Configuration on R4: Stored in flash:advanced-tgn.cfg 45
IOS Configuration on ALS1: Stored in flash:advanced.cfg 45
NQR Configuration 46
Sample Advanced Pagent Configuration 46
R1 47
R2 47
R3 47
R4 48
R4 NQR 48
Lab 3-2: Installing SDM (3.6.2) 49
Scenario 49
Step 1: Lab Preparation 49
Step 2: Prepare the Router for SDM 49
Step 3: Configure Addressing 50
Step 4: Extract SDM on the Host 52
Step 5: Install SDM on the PC 55
Step 6: Run SDM from the PC 59
Step 7: Install SDM to the Router 61
Step 8: Run SDM from the Router 66
Step 9: Monitor an Interface in SDM 68
Lab 3-3: Configuring QoS with SDM (3.6.3) 69
Scenario 69
Preparation 69
Step 1: Configure Physical Interfaces 70
Step 2: Configure Routing with EIGRP 71
Step 3: Connect to R1 Using SDM 71
Step 4: Use the SDM QoS Wizard 72
Step 5: Verify QoS Operation with SDM 77
Chapter 4 DiffServ QoS Model 79
Lab 4-1: Default Queuing Tools (4.11.1) 79
Scenario 79
Preparation 79
Step 1: Configure Addressing 80
Step 2: Configure EIGRP AS 1 83
Step 3: Contrast Interface Queuing Strategies 85
Step 4: Verify and Change Queuing Modes 87
Step 5: Modify Default Queuing Settings 93
Lab 4-2: Intermediate Queuing Tools (4.11.2) 95
Scenario 95
Preparation 95
Step 1: Configure the Physical Interfaces 96
Step 2: Configure EIGRP AS 1 97
Step 3: Configure Custom Queuing 98
Step 4: Configure Priority Queuing 104
Challenge 107
Lab 4-3: TCP Header Compression (4.11.3) 108
Scenario 108
Step 1: Configure Addressing 108
Step 2: Enable Telnet Access on R2 108
Step 3: Enable TCP Header Compression 108
Step 4: Verify TCP Header Compression 109
Lab 4-4: Comparing Queuing Strategies (4.11.4) 111
Scenario 111
Preparation 111
Step 1: Configure Addressing and Routing 112
Step 2: Create NQR Configuration for Testing Purposes 113
Step 3: Test FIFO Queuing 115
Step 4: Test Weighted Fair Queuing 115
Step 5: Test Custom Queuing 116
Step 6: Test Priority Queuing 116
Lab 4-5: Class-Based Queuing and NBAR (4.11.5) 117
Scenario 117
Preparation 117
Step 1: Configure the Physical Interfaces 118
Step 2: Configure EIGRP AS 1 119
Step 3: Configure NBAR Protocol Discovery 120
Step 4: Classify and Mark Packets 122
Step 5: Shape Traffic and Queue with CBWFQ and LLQ 127
Challenge: Verifying IP Precedence 131
Lab 4-6: Class-Based Marking, Shaping, and Policing (4.11.6) 133
Scenario 133
Preparation 133
Step 1: Configure the Physical Interfaces 134
Step 2: Configure Routing 135
Step 3: Mark Packets with DSCP 135
Step 4: Configuring Class-Based Shaping 138
Step 5: Configure Nested Service Policies 140
Step 6: Configure Traffic Policing 142
Step 7: Configure Class-Based TCP Header Compression 143
Lab 4-7: WAN QoS Tools (4.11.7) 145
Scenario 145
Preparation 145
Step 1: Configure the Physical Interfaces 146
Step 2: Configure Multilink PPP 147
Step 3: Configure Multilink PPP LFI 151
Step 4: Configure Routing 152
Step 5: Configure Generic Traffic Shaping 153
Step 6: Configure Committed Access Rate Policing 153
Lab 4-8: Shaping and Policing (4.11.8) 155
Scenario 155
Preparation 155
Step 1: Configure Physical Interfaces and Routing 156
Step 2: Configure NQR on R4 156
Step 3: Configure Traffic Policing 158
Step 4: Configure Traffic Shaping 158
NETLAB-Compatible NQR Configuration 159
Lab 4-9: QoS Pre-classify (4.11.9) 160
Scenario 160
Preparation 161
Step 1: Configure the Physical Interfaces 161
Step 2: Configure Static Routing 162
Step 3: Configure the GRE Tunnel 163
Step 4: Configure Routing 164
Step 5: Enable the QoS Pre-classify Feature 164
Lab 4-10: Quality of Service Challenge Lab 167
Lab 4-11: Quality of Service Troubleshooting 168
Initial Configurations 169
Chapter 5 AutoQoS 173
Lab 5-1: AutoQoS (5.3.1) 173
Scenario 173
Preparation 174
Step 1: Configure the Physical Interfaces 174
Step 2: Configure EIGRP AS 1 176
Step 3: Configure AutoQoS 177
Step 4: Configure AutoQoS with DSCP 184
Chapter 6 Wireless Scalability 187
Option 1: Using the External WLAN Controller 187
Option 2: Using the WLAN Controller Network Module 189
Lab 6-1a: Configuring an External WLAN Controller (6.6.1a) 192
Scenario 192
Step 1: Device Preparation 192
Step 2: Basic Switch Configuration 192
Step 3: Switched Virtual Interface Configuration 194
Step 4: DHCP Configuration 194
Step 5: Spanning Tree PortFast Configuration 196
Step 6: Host Configuration and Verification 196
Step 7: IP Routing Configuration and Verification 198
Step 8: WLAN Controller Wizard 199
Step 9: Telnet and HTTP Access to the WLAN Controller 200
Lab 6-1b: Configuring a WLAN Controller Installed in a Router (6.6.1b) 202
Scenario 202
Step 1: Device Preparation 202
Step 2: Basic Switch Configuration 203
Step 3: Subinterface Configuration for R1 and the WLAN Controller 203
Step 4: DHCP Configuration 204
Step 5: Spanning Tree PortFast Configuration 205
Step 6: Host Configuration and Verification 206
Step 7: IP Routing Verification 208
Step 8: WLAN Controller Configuration 208
Step 9: Telnet and HTTP Access to the WLAN Controller 211
Lab 6-2: Configuring a WLAN Controller Through the Web
Interface (6.6.2) 213
Step 1: Basic Device Configuration 213
Step 2: WLAN Controller Monitor Page 213
Step 3: Configure Logical Interfaces on the WLAN Controller 215
Step 4: Configure WLANs 220
Lab 6-3: Configuring a Wireless Client (6.6.3) 225
Step 1: Aironet Installation Program 226
Step 2: Configuring Profile and SSID 230
Step 3: Diagnostics 233
Lab 6-4: Configuring WPA Security with Preshared Keys (6.6.4) 235
Scenario 236
Preparation 236
Step 1: Connect to the WLC from the Host 237
Step 2: Assign a VLAN to a WLAN 238
Step 3: Connect to WLAN Using Cisco Aironet Desktop Utility 244
Lab 6-5: Configuring LEAP (6.6.5) 248
Scenario 248
Preparation 249
Step 1: Install CiscoSecure ACS 250
Step 2: Set Up ACS for LEAP 254
Step 3: Connect to the WLC from the Management Host 260
Step 4: Set Up a RADIUS Server 261
Step 5: Assign a WLAN to a VLAN 263
Step 6: Configure the Wireless Client 267
Chapter 7 Case Study 271
Case Study: QoS and MLPPP 271
| Erscheint lt. Verlag | 3.4.2008 |
|---|---|
| Reihe/Serie | Cisco Networking Academy - Mind Wide Open |
| Verlagsort | Indianapolis |
| Sprache | englisch |
| Maße | 274 x 218 mm |
| Gewicht | 662 g |
| Themenwelt | Mathematik / Informatik ► Informatik ► Netzwerke |
| Informatik ► Weitere Themen ► Zertifizierung | |
| ISBN-10 | 1-58713-216-8 / 1587132168 |
| ISBN-13 | 978-1-58713-216-2 / 9781587132162 |
| Zustand | Neuware |
| Haben Sie eine Frage zum Produkt? |
aus dem Bereich


