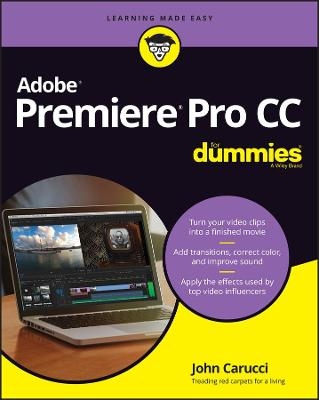
Adobe Premiere Pro CC For Dummies
For Dummies (Verlag)
978-1-119-86749-4 (ISBN)
Ever wonder how your favorite video creators regularly put out such slick content? They're probably using Adobe Premiere Pro CC, a go-to video production app for both professional and amateur video creators.
Adobe Premiere Pro CC For Dummies walks you through each step of editing and producing slick and stylish videos that stand up to what the pros post. From transferring your digital movie files from your camera or phone to your computer all the way to uploading your latest creation to YouTube or the web, this book has the info you need to bring your ideas to life.
If you're new to video production, you can begin at the beginning with the handbook's user-friendly guide to the basics of setting clips on the timeline and making them flow seamlessly. Or, if you've already got a few videos under your belt, you can skip right to the more advanced material, like special effects and handy tricks of the trade.
You’ll also find:
Instruction on joining video clips into a continuous final product, complete with transitions, special effects, and more
Advice on improving sound, getting rid of color errors, and customizing the look of your videos with filters and aftereffects
Straightforward guides to adding voiceovers and soundtracks to your videos
So, if you're new to Adobe Premiere Pro CC—or digital video editing in general—Adobe Premiere Pro CC For Dummies is the first and last resource you'll need to start editing like a pro.
John Carucci is not a celebrity, though he certainly brushes up against the stars of stage and screen on a regular basis in his role as an Entertainment TV Producer with the Associated Press. Along with hobnobbing with actors and musicians, John is also author of Digital SLR Video & Filmmaking For Dummies and two editions of GoPro Cameras For Dummies.
Introduction 1
About this Book 1
How this book is organized 2
Icons Used in the Book 3
Beyond the book 4
Part 1: Getting Familiar with the Adobe Premiere Pro Universe 5
Chapter 1: Perusing the Premiere Pro Landscape 7
Understanding What Premiere Pro Can Do 8
Dissecting the Workspace 8
Breaking down the interface 9
Ingesting and Editing 9
Understanding the panels 10
Getting around the workspace 10
Having a Panel Discussion 11
Knowing the Project panel 11
Spending some time with the Timeline panel 13
Making the most of the Source and Program Monitors 14
Grasping the Effects and Effect Controls panels 15
Feeling out the other panels 16
Using the libraries 18
Tooling Around the Toolbar 18
Chapter 2: Understanding the Premiere Pro Workspace 21
Identifying Your Needs 22
Working with your computer platform 22
Are you a Mac? 22
Or are you a PC? 24
Naming PC models is a little harder 24
The systems are not that far apart 26
Look before you leap on your PC 26
Understanding Workstation Requirements 27
Determining if your computer is right 28
Breaking down the differences between Mac and PC 29
Respecting the graphics card 29
Needing GPU acceleration 30
Random access memory 30
More Hard Drive Space, Please 30
Solid-state drives 31
Conventional hard drives 31
Not all hard drives are created equal 32
Scratch disks 32
Managing other computer components 33
Keying into keyboard types 33
Eeek, a mouse! 33
USB-C is the new black 34
Looking at Capture Gear 34
Smartphone capture 34
Top-of-the-line video cameras 35
Broadcast video camera 36
Consumer-level camcorders 36
Digital single-lens reflex 37
Point-and-shoot video options 37
Mirrorless camera 38
Going GoPro 39
Card readers and capture devices 39
Audio recorders 40
Going to the videotape 40
Defining Users 41
Neophyte user 42
Intermediate 42
Professional photographer 42
Video enthusiast 43
Social media influencer 43
Chapter 3: Adjusting Premiere Pro to Suit Your Needs 45
Setting Up Your Workspace 45
Subscribing and installing software 46
Feeling welcome 46
Using workspace presets 46
Edit workspace order 49
Adding a clip description 49
Customizing and saving your workspace 49
Moving panels 50
Saving your workspace 50
Hiding workspace presets 51
Using a second monitor 51
Using your iPad as a second monitor 52
Set up your iPad monitor 53
Using a broadcast monitor 53
Breaking down keyboard shortcuts 54
Personalizing keyboard commands 55
Single Key shortcuts 56
Using a skin 56
Setting your scratch disk 56
Render files 57
Pointing in the right direction 57
Tweaking Program Settings 57
Setting preferences 58
Optimizing performance 60
Fine-tuning your setup 60
Customizing the Windows 61
Doing the panel dance 61
Sizing the monitor 61
What’s inside counts 62
Adjusting the timeline 63
Modifying the Project panel 63
Freestyling with Freeform 63
Understanding the Audio Mixers 64
Audio Clip Mixer 66
Part 2: Gathering Content 67
Chapter 4: Sorting Out the Elements of Video Production 69
Defining Digitized Video 69
Binary refinery 70
Digital Video 70
High Definition is the flavor of the day 71
Fawning over 4K 71
Vying with VHS 72
Explaining Digital Video Fundamentals 72
Understanding how video works 72
Dealing with aspect ratio 73
Frame rates 73
Understanding timecode 74
Understanding formats 74
Breaking down the best file types 74
Capturing Great Video 75
Controlling the camera 75
Arranging the scene 77
Understanding shot lingo 79
Lighting the scene 80
Waiting for the sun 80
Communicating through light 81
On-camera video lights 81
The French call it mise-en-scène 83
Chapter 5: Prepping Your Movie Projects 85
Starting Your Project 86
Creating a project 86
Opening an existing project 88
Tweaking the Settings 88
Project settings 88
Title safe margins 89
Getting those preferences right 89
Timeline preferences 91
Auto Save preferences 91
Playback preferences 92
Scratching the scratch drive surface 92
Making a Sequence 94
Setting each sequence 94
Making a custom setting 94
Adjusting the Timeline 96
Increasing the height of the video and audio tracks 97
Fill the screen with a panel 98
Chapter 6: Importing Media into a Project 101
Starting Your Project 102
Ingesting media 102
Adobe Bridge 103
Transferring from a card reader 103
Editing directly from a card 105
Capturing tape from a camcorder 105
Downloading clips 107
Importing media 107
Adding music and audio clips 108
Recording ADR 108
Sound effects 108
Adding a soundtrack 109
Finding the right music 109
Grabbing royalty-free music from the web 110
Prepping still images for the timeline 111
Organizing Media 112
Creating bins 113
Color coding your bins 113
Tagging with metadata 113
Understanding data types 115
Move it on over 115
Entering data 116
Bins versus tags 116
Part 3: Editing Your Masterpiece 117
Chapter 7: Preparing Your Video for Editing 119
Getting the Lowdown on Your Clips 120
Analyzing clip details 120
Keeping bins lean and clean 121
Playing clips smoothly 121
Altering playback resolution 122
Knowing how far can you go 122
Changing playback resolution 123
Working the In and Out Points 123
Setting In and Out points 123
Using markers 125
More than a bookmark 125
Types of markers 125
Making your mark 126
The Markers panel 127
Modifying Clips 128
Scrubbing through the clip 128
Using keys 128
Using the arrow keys 128
Marking the scrubbed clip 128
Adjusting clip duration 129
Changing speeds 129
Rate Stretch tool 130
Here’s how to use it 130
Reversing the action 130
Understanding Clip/Speed Duration 131
Rippling through the Ripple tools 131
Ripple Edit tool 132
The Rolling Edit tool 132
Chapter 8: Editing in the Timeline 133
Managing Your Sequence 134
Populating the timeline 134
Adding clips 134
Backing it up a bit 135
Moving clips 136
Dragging clips into the timeline 136
Adding clips through the Program panel 136
Source Patching and Targeting 137
What you drag isn’t always what you get 138
Fine Tuning Your Clips 139
Trimming clips 139
Handling enough clip frames to trim 140
Naming clips 140
Expanding to see waveforms 141
Freezing frames 141
Choosing Insert Frame Hold Segment 143
Advanced Timeline Tricks 143
More advanced clip movement 143
Using the Track Select tool 143
Overwrite a clip with an adjacent clip 143
Considering the three-point edit 144
Back-timing edits 145
Trying a four-point edit 146
Making the right choice 147
Chapter 9: Transitioning between Clips 149
Choosing Effective Transitions 150
Perusing the transition palette 151
Why do you need transitions? 151
Grasping Transition 101 153
Setting default transitions 155
Apply default transitions 156
Controlling transitions 156
Using clip handles 158
Advanced Transition Techniques 158
Planning for your transitions 159
The one-sided transition 159
Differentiating transitions in the timeline 159
Changing and deleting transitions 159
Copying and pasting transitions 160
Plug in to your transitions 160
Chapter 10: Finishing Your Edited Video 161
Exercising Video Correction 161
Fixing exposure issues 162
Tweaking those tones 162
Adjusting color 163
Cropping to fill the frame 163
What can you do about it? 164
Correcting Color and Tone 165
Grasping Lumetri Color 165
Understanding the Lumetri Color Landscape 166
Adjusting tone 167
Making a quick correction 169
Codec limits 170
Using color for style 170
Matching color in the scene 171
Using Video Scopes 171
Accessing the scopes 172
Different scopes for different folks 173
Defining the “scope” of terms 174
Exploring Some Advanced Techniques 175
Making adjustment layers 175
Making an informed decision 176
Using Comparison view 176
Removing a color cast 177
Adding punch to the clip 178
Quickly correct luminance 178
Color correction with an Adjustment Layer 179
Chapter 11: Constructing the Video Composite 181
Understanding Compositing 182
Layering clips 182
Adjusting opacity to reveal 183
Messing with opacity 183
Using the Opacity and Blend modes 184
Striking the right balance between clips 184
Let’s look at the Blend modes 187
Introducing the Blend modes 187
Applying a Blend mode to an adjustment layer 192
Transform effect and adjustment layers 192
Merging clips in a nest 192
Working with the nested clip 193
Understanding alpha channels 193
Creating an image mask 195
Working with Keyframes 195
How keyframes work 195
Keyframing in action 196
Compositing with Special Effects 199
Keen on green screen 199
Blue too for chroma 199
Shooting your very own chroma key 199
Putting your green-screen composite together 201
Fine-tuning your key 202
Layering video 202
Making clips side-by-side 204
Chapter 12: Choosing Cool Effects for Your Movie 207
Understanding Effects 207
Enhancing the look of your video 208
Improving the scene with Lighting Effects 208
Controlling Lighting Effects 209
Breaking down light types 210
Scaling video 212
Cropping video 214
Making Corrections 215
Dealing with shaky footage 215
Understanding Warp Stabilization 215
Warp Stabilization settings 216
Blurring video 217
Using Blur under a still image 217
Making video sharper 219
Creating a mosaic 219
Removing effects 220
Adding a timecode 221
Playing with Your Clips 222
Flipping video 222
Changing speeds 223
Time lapsing your video 224
Trying Turbulent Displace 224
Chapter 13: Working with Audio 227
Understanding Your Audio Needs 227
Sound matters 228
Defining great sound 228
Adjusting audio levels 229
Mixing audio 230
Get those levels right 230
Simplifying varying audio levels 231
Beginning with Recording the Audio 232
Considerations for capturing audio 233
Be aware of sound on the scene 233
Working with Audio in Your Movie 235
Linking and unlinking tracks 235
Working with separate tracks 237
Navigating the Essential Sound Panel 239
Using the Essential Sound panel 239
Working with audio tracks in the Essential Sound panel 240
Organization is key 241
Assigning audio track roles 241
Delving into the Dialogue presets 241
Looking into the Music option 243
Effecting the SFX track 244
Adjusting Ambience 245
Making voices sound better 246
Chapter 14: Dazzling with Titles and Graphics 249
Understanding Titles and Motion Graphics 250
Using the Text Tool 250
Navigating the Essential Graphics panel 250
Browsing the templates 250
Using Text to Speech 251
Creating a transcript 252
Creating Captions 253
Understanding Create Captions Controls 254
Editing text 255
Editing Graphics 255
Searching for a graphic is easy 256
The Browse section 256
The Edit section 257
Putting words on the screen 258
Breaking down text adjustments 258
Replacing fonts 258
Create graphics 260
Adjusting graphics 260
Making a text layer 260
Creating titles 261
Adding static titles 261
Title Safe and Action Safe 262
Making a graphic title 263
Smartening up your movie 263
Crediting your movie 263
Arranging your opening movie credits 264
Closing credits 265
Adding credits to your movie 266
Making your own rolling credits 266
Identifying a subject with a lower third 270
Tweaking fonts 270
Making a (simple) motion title 271
Part 4: Finishing Off Your Project 275
Chapter 15: Finalizing Your Project 277
Being Your Own QC Monitor 278
Watching and studying 278
Assuring clip continuity 278
Matching audio levels 280
Checking graphics and titles 280
Previewing the Timeline 280
Casting a critical eye 281
Having gap insurance 281
Watching on an external monitor 282
Viewing the meters 282
Listening on speakers 283
Being a good listener 283
Hearing with your eyes closed 283
Fine-Tuning Video for Export 284
Pre-export process 284
Being efficient 284
Bumping up the preview quality 285
Avoiding crashes 286
Checking the timeline closely 288
Dividing the export 288
Relinking media 289
Grabbing freeze frames 290
Here’s how to make a freeze frame 291
Exporting a JPEG sequence 292
Chapter 16: Kicking Out Your Movie 295
Exporting Your Movie 295
Familiarizing yourself with the Export panel 297
Choosing a format 297
Introducing the presets 298
Understand the top video file extensions 298
Popular file formats 299
Checking the Summary 300
The lower section of the Export panel 300
Bitrate Setting 300
Checking the right boxes 301
Knowing the difference between file containers and codecs 302
Setting output names for delivery 303
Choosing the Right File Format for Your Needs 304
Exporting uncompressed video as a master file 304
Pre-export checklist 305
Exporting a portion of the movie 306
Pointing the file to a folder 306
Saving settings for future exports 306
Converting outside Premiere Pro 307
Chapter 17: Spanning the Globe with Your Movie 309
Showing Your Movie 310
On your computer 310
Watching on a smartphone 310
Tablet viewing 311
Projecting on a screen 311
Playing on a home theater 312
Cast a movie on your iPhone or iPad 313
A warning about intellectual property 313
Using the World’s Largest Screening Room 314
Uploading your movie 314
Sharing videos on YouTube 315
Sharing video on Vimeo 317
Using Social Media 320
Showing your movie on Facebook 321
Instagram 321
Twitter video is meant to be short 323
Twitter video upload requirements 324
TikTok 324
Sharing your Movie 325
WeTransfer 325
iCloud 326
iCloud Drive 326
Dropbox 327
Hightail 327
Google Drive 327
Going Old School 328
Burning to DVD 328
DVD creation software 330
Export to tape 330
Color bars 331
Adding a good leader 332
Part 5: The Part of Tens 333
Chapter 18: Ten Ideas for Making Fantastic Movies 335
Making Your Own Brady Bunch Opening (Or Something Like It) 336
Exploiting Montage Editing 337
Showing Restraint While Using Plug-ins 338
Transforming Your Movie to Film Noir 339
Making Still Images Move (The Ken Burns Effect) 340
Adding a voiceover 340
Producing Your Own News Segment 341
Using Transitions to Help Tell the Story 342
Applying a Filter Over Your Movie 343
Having Fun by Reversing Motion 344
Chapter 19: Ten Essential Premiere Pro Plug-Ins 345
Knocking Out Your Movie with the Cine Punch Bundle 346
Roll with Motion Array Premiere Pro Transitions 346
Making Your Still Photo “Pop” Using Photo Montage 2 347
Producing the Look of Film Stock with Film Convert Nitrate 347
Emulating Star Wars Opening Titles with the Free Star Titler 347
Sweetening Up Audio with Accusonus ERA 5 Bundle 348
Prettying Up Your Subject’s Skin Tones with Make Up Artist 3 348
Adding Pizazz between Shots with Andy’s Swish Transitions 348
Making Seamless Time-Lapse and Slow-Motion Video with Flicker Free 349
Simulating Beams of Light Coming through Portals with Light Rays 349
Chapter 20: Ten Tips for Making Video Easier to Edit 351
Shooting Movies “Horizontally” with Your Smartphone 352
Producing Better Video to Edit by Keeping It Steady 353
Shooting to Edit for Quicker Turnaround 354
Taking Advantage of Natural Light 356
Handling Each Shot for Your Edit 357
Seeing True Video Quality with a Calibrated Monitor 358
Adding Drives for Scratch Space 358
Ditching the Pinhole for a Microphone 359
Using an Audio Recorder for Great Sound 360
Converting Master Files into the Right Format 360
Index 363
| Erscheinungsdatum | 21.04.2022 |
|---|---|
| Sprache | englisch |
| Maße | 185 x 231 mm |
| Gewicht | 658 g |
| Themenwelt | Informatik ► Grafik / Design ► Film- / Video-Bearbeitung |
| Informatik ► Office Programme ► Outlook | |
| ISBN-10 | 1-119-86749-5 / 1119867495 |
| ISBN-13 | 978-1-119-86749-4 / 9781119867494 |
| Zustand | Neuware |
| Haben Sie eine Frage zum Produkt? |
aus dem Bereich


